Showing posts with label crafts. Show all posts

Tuesday, April 21, 2009

How to Make a Cloth Covered Book for Pressed Flowers or Nature Journal

Making a Cloth covered Book

You will need:

  • 2 pieces of 6 ½ “ x 9 ¼” cardboard
  • An embroidery needle and thread
  • 16” x 12” piece of fabric an old dress, T-shirt, or pillowcase will work well
  • 8 pieces of 8 ½ “ x 11” paper
  • 1 piece of fancy or coloured 8 ½ “ x 11” paper
  • Wide packing tape and regular tape
  • a ruler
  • fabric glue
  • 12” of ribbon
  • Scissors

Instructions:

  • Fold the plain paper and the fancy paper in half.
  • If the fancy paper looks different on the front than on the back, fold it so that the “front (the prettiest” side is on the inside.
    2 setting the pages

  • Put the folded plain paper inside the folded fancy paper, like a book, then use your needle and thread to sew the papers together in two places, about an inch and a half from the top and an inch and a half from the bottom.
3 sewing the pages
You have completed the book section.
Set it aside and proceed to the book cover
  • Cut your fabric to about 16” by 12” and lay it out, wrong-side facing up.
  • Place the two pieces of cardboard in the middle of the fabric, leaving about a quarter of an inch between each piece.
  • Tape the cardboard pieces together and maintain the quarter inch separation.
  • Coat the back of the cardboard lightly with fabric glue and the glue the cardboard to the cloth.
  • Fold and glue each of the corners first and then use tape to secure the fabric if necessary; just make sure the tape does not stick up close to the outer edge.
    Now you’ve made the fabric book cover.

    1 cover


Next:

  • Cut your 12” ribbon in half.
  • Use your ruler to find the center of the left side of the fabric cover and glue the end of one ribbon there (starting about two inches from the end of the ribbon).
  • Try not to over glue, but also try to make sure you glue right to the very edge so that the ribbon is firmly attached.
  • Secure with tape.

4 adding the ribbon
  • Do the same thing on the right side of the cover with the other ribbon.
  • Open your papers and place them in the middle of the cardboard and fabric so that the fold of the paper is right in the center of the tape between the cardboard pieces.
  • Using the fabric glue, glue the outer paper (the fancy paper) to the inside of the cover and let it dry.
  • Once the glue has dried, tie the ribbon to close your book.

6 outside cover


It’s not as secure an a lock and key, but it is a pretty way to keep safe your handmade journal, should your choose to use it as a secret diary.
It could also be a pretty Nature Journal for your nature studies or a place to save your pressed flowers.

May this glorious Orange Tuesday bring you much happiness while you endeavor to make this personal Cloth Covered Book!

Kathleen

post signature

Tuesday, April 7, 2009

It's Another Orange Daring Tuesday!! How to tie Knots

Knots are not only useful, but they can be a lot of fun to do!
I have been using knots for years and I can say it was one of the skills I learned in scouting that has truly come in handy many times over the years.
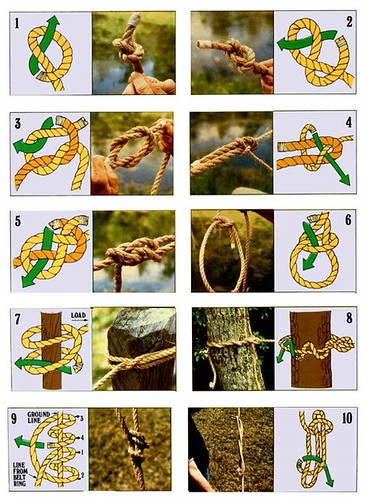
Ten Basic Knots
HOW TO - Tie the 10 most useful knots

Here's a guide on how to tie 10 useful knots including -
1. Overhand Knot
2. Figure-eight Know
3. Reef (Square) Knot
4. Sheet (Becket) Bend
5. Carrick Bend
6. Bowline
7. Clove Hitch
8. Timber Hitch
9. Taut-line Hitch
10. Sheepshank

ROPE RHETORIC
However, before you start to learn down-home knotsmanship, a brief summary of rope vocabulary is in order.


BITTER END: The end of a rope that's being manipulated ... also called the "working end."

STANDING PART: the segment of the rope that you aren't using at the moment. It can be coiled, stretched, or otherwise left inactive.

BIGHT: a curve or are in the rope. This can be a semicircle or a loose loop through which the working end may run.

There are over 4,000 hitches and bends used in special crafts, but—with the following 10 knots in your rope repertoire—you'll be able to handle just about any situation that requires you to fasten two objects together, secure one line to another, or tie a rope to a solid object.
As we go along, take a look at the numbered photos and diagrams ... and practice with ropes of your own until your memory has mastered these often essential knots.

THE 10 BEST KNOTS

[1] OVERHAND KNOT: This one is easy ... just bitter end over and under the bight. The overhand is used as a temporary stopper to prevent a rope from unraveling or passing through a ring, eye, or pulley. It's also a starting point for other knots, including the reef or square-knot.

[2] FIGURE-EIGHT KNOT: The figure eight is a better stopper knot than the overhand, because it's easier to untie after the rope has been pulled tight. Just form a bight with the working end over the standing part ... run the bitter end under the standing part to form a second bight ... then put the bitter end through the first bight. The result looks like a sideways numeral 8.


[3] REEF (SQUARE) KNOT: Use this one to lash two objects together with one line, or to join two separate ropes. But take care: The reef knot will often slip under strain ... if the two ropes knotted together are of different diameters.
Actually, the square knot is simply two overhand knots—one on top of the other—with the second tied in the opposite direction from the first. When the knot is formed, the bitter ends and standing parts of each line will lie together inside the two bights.
(CAUTION: A granny knot looks a bit like a reef knot, but the bitter ends will be on opposite sides of the bights from the standing parts. Beware of the granny ... she's slippery and can't take a load.)

[4] SHEET (BECKET) BEND: You should use this knot to join two ropes of different diameters, It's much stronger and less slip-prone than the square knot, but can be easily untied no matter how wet and tight it may be. Just form a bight (big enough to work with) in the larger of the two lines. Run the working end of the smaller line through the loop ... around the doubled heavier cord ... back over as own standing pail ... then under the bight in the larger line. Always snug the sheet bend up by hand before you put any strain on it.

[5] CARRICK BEND: This knot is less well known than the reef or sheet bend, but it's stronger than either of them and just as easy to loosen ... even after a sustained, hard pull. To tie it, just form a loop in one rope, with the working end crossing under the standing end. Then, pass the bitter end of the other cord beneath this bight, over the first rope's standing end, down under its working end, over one side of the loop, under its own (the second rope's) standing end, and - finally- over the second side of the loop.
The Carrick bend will require a good bit of practice before it becomes natural to you. However, if a "Best Bend" award existed, this tricky knot would be sure to walk off with the trophy.

[6] BOWLINE: The purpose of the bowline is to form a secure loop in the end of a line. It can be tied swiftly and is easily loosened ... even when it's under strain. Simply form a closed bight in the rope (leaving an ample working end, which will form the loop), bring the bitter end up through the bight, around the standing end, back down through the bight again, and pull the knot tight.
One slight caution: The good ol' bowline—which holds with fair reliability in natural fiber ropes—may slip when tied with some slick-surfaced synthetic lines.

[7] CLOVE HITCH: This hitch won't be secure unless there's a load acting on both ends of the knot, and should only be considered as a general utility hitch for temporary use. To make it, roll a bight around a pole, pipe, or post and then across the standing part. Next, make a second turn around the pole and pass the bitter end under the last bight. You can tie a clove hitch before you need it—so the hoop can be passed over a post-or the knot can be put in with a loop-the-loop operation (as over your pickup truck's cargo tie down hooks) while tension is held on the standing part of the rope. It's a so-called "jam" knot, because the harder the strain it takes, the tighter the knot becomes ... yet it can be slipped the second the stress is removed.

[8] TIMBER HITCH: This knot is designed to roll around a tree to hold a temporary guy, to drag or winch a log, or to lift timber with a boom hoist. Just loop the bitter end of the rope around a tree, timber, or log, then turn it around the standing part, and twist it back along the bight for as few as two-or as many as eight turns. (The more turns, the less likely the knot is to slip under strain.)
Any pull on the standing part will tighten the timber hitch and jam the turns of the rope against the surface of whatever is being lifted, dragged, or towed. When stress on the standing part is eased, the timber hitch can easily be unwound and released.

[9] TAUT-LINE HITCH: Here's a handy knot for folks who work or play around high places. The taut-line hitch will slide up and down to provide a climber with freedom of movement, but—should he or she slip—it will tighten up and stop the fall short.
Start this knot by throwing a rope over a branch (or whatever) so that two lines hang parallel to each other. The longer end—which extends down to the ground—is called (appropriately) a ground line. The other end of the rope should be looped (twice) through a ring in a special climber's belt, leaving a working end of about two feet in length.
Take this 24-inch tail and pass its working end around the ground line in a clockwise direction to form two complete tight loops, the second below the first. Then, form two more clockwise loops (also around the ground line) but at a point above the first two and with the difference that—each time the leading end is brought around the ground line to complete these coils—it must pass under its own bight. Hence, the complete knot includes four tight loops, side-by-side, around the ground line ... and resembles four doughnuts on a stick.
Counting from the top downward, the loops of a correct hitch are tied in this order: 3, 4, 1, 2 ... that is, the top was the third to be tied, the second from the top was the last to be tied, etc.
In the complete knot, the leading end should remain sticking out 10 inches or so and should have a figure-eight knot tied to its end to prevent it from accidentally slipping through the loop of the taut-line hitch, should that knot ever become loose.

[10] SHEEPSHANK: This is a special purpose knot that's useful when you have too much rope to conveniently handle a specific job but don't want to cut your valuable line.
To make the sheepshank, lay two long bights (in the standing part) side-by-side like a wide letter S, then secure both loops with half hitches. This knot can also be used to bypass an area in a rope that's been weakened by excessive chafing. You can just shake the knot loose when the strain is released.

There are any number of other knots you'll find just as useful as our "10 best" ... so don't stop once you've mastered these few starters. You can, for example, get into such colorful specialties as the fisherman's bend, cow hitch, surgeon's knot, wagoner's hitch, packer's knot, man-harness knot, fireman's-chair knot, scaffold hitch, barrel knot, and the boatswain's hitch.
So, get yourself a hunk of rope ... and knots to you!

This information was inspired by " The Dangerous Book for Boys" but due to a shortage of time, (I am in the middle of taxes), I am using an article from "Mother Earth News"
http://www.motherearthnews.com
Hope you enjoy it!

Have a fabulous ORANGE DAY!
Kathleen

Sunday, April 5, 2009

It's a Purple Environmental Sunday - Bubbles!!!

This would have been posted so much earlier, but I have been trying to figure out how to get my signature to automatically post with each post. I have seen it on other peoples posts and I like it.
I have followed the instructions but I must be missing something because the signature is on Flickr but not showing up on the posts. I thought it might have been a problem with a space that had been added between the quotes , but I deleted the space and it is still not working. I am going to give it a rest for a while.
It would be cool to have it, but it is not the most important thing in my life.

Well, today is a Purple Day!! Yeah!
I love purple!
Wait, I love all colours!
I guess that means every day is my special day!
I was trying to pick what special creative project I could share form the "Earthways " book. There are so many it is hard to choose. First, I narrowed it down to the Spring season, but still there were quite a few left.
I have decided on the Bubbles. Spring is fun, Bubbles are fun. What better way to celebrate the new season!
Whether you are still inside due to bad weather, or outside enjoying the sunny Spring weather, bubbles will be a fun addition to your day.
It is magical, fun, quiet and soothing whether it's raining or shining outside.
Beautiful rainbow bubbles, what a joy to experience them.

You will need:
  • mild dish soap(use non-toxic)
  • glycerin (available at pharmacies)
  • tablespoon
  • quart jar
  • spoon
  • straws of bubble wands
  • Little jars of cups to hold each child's portion of bubble stuff

What to do:
1. Mix bubble stuff by gently combining 2 tablespoon of liquid dish soap and 2 tablespoons of glycerin with a quart of water.

2. Stir them gently so the mixture does not get too bubbly.

3. Make rules clear before the children begin to blow bubbles.
Rules will differ depending on whether you are inside or outside.
The author of Earthways said that they would all sit around a table when they were indoors and there were four rules:

1. Only pop your own bubbles, not someone else's.
2. Don't blow into the jar, as this quickly exhausts the bubble stuff
3. Stay in your seats, no running around chasing bubbles indoors.
4. Watch them float around the room.

For indoor bubble blowing, these rules helped to create a quiet, calm atmosphere.
Outdoors of course is another story, as children can run like the wind chasing bubbles!
Just don't run with the bubble stuff.

Watch young ones as they may try to suck in the bubble stuff up the straw.
Gently blowing the bubble stuff onto a table will create pretty rainbow bubble domes.
Next week will will make wind wands!
I hope you had a fun Environmental Purple Sun!


Kathleen

Saturday, March 28, 2009

Sunday is Environmental Purple Day - Lets make a Dish Garden for Spring!!

Today is a Purple day.

Sunday the last day of the weekend, the first day of the week.
Purple combines the stability of blue and the energy of red. Purple is associated with royalty. It symbolizes power, nobility, luxury, and ambition. It conveys wealth and extravagance. Purple is associated with wisdom, dignity, independence, creativity, and mystery.
Purple embodies the balance of red simulation and blue calm. This dichotomy can cause unrest or uneasiness unless the undertone is clearly defined at which point the purple takes on the characteristics of its undertone. A sense of mystic and royal qualities, purple is a colour often well liked by very creative or eccentric types.

How the colour purple affects us mentally and physically:
* Uplifting
* Calming to mind and nerves
* Offers a sense of spirituality
* Encourages creativity

Environmental Sunday:
This is a wonderful day to reflect on this wonderful gift we have been given by our Creator, the Earth. Teaching our children how to take care of the environment and will help to set the tone for the coming week. I love the book "Earthways", Simple environmental activities for young children and will be sharing wonderful ideas I have found within its pages.

This is a perfect time to set up a Spring table.
1. Use pastel colour play silks - pale pinks, light blues, spring greens, yellows
(if you do not have play silks use other cloths or a small table cloth.
2. Clip a small blooming branch, Forysthia or fruit tree, and place in a small vase
of water.
3. Set on table.
4. Maybe add a duck, frog or a little gnome.

For some live greens, make a small Dish Garden.

You will need:
  • small clay saucer appr 4" in diameter, the kind you put under flower pots
  • crayons
  • potting soil
  • large spoons
  • grass seed (a quickly sprouting variety if possible, you do not need much
  • bowls
  • plant mister or spray bottle
  • small sea shells
  • beeswax
  • tiny branches
1. Let your child decorate the outside of the clay saucer with a crayon.

2. Set up a potting table outside or lay newspapers down on the kitchen table
and set the clay saucer, potting soil and other items out on top of the newspapers.

3. Let your child spoon the soil into their dish, filling it about 3/4 full.

4. Children often prefer to use their hands for this.

5. Let them it is a great tactile experience.

6. Moisten the soil with the mister, sprinkle on a good layer of seed (not too
thick, but make sure to cover the soil surface well)

7. Cover with a thin layer of soil. This last layer is not absolutely necessary,
but your child will like "tucking their seeds into bed".

8. A final watering with the mister, and the garden can be put on a sunny window
sill to be watched with anticipation for the first signs of life.

NOTE: Moisture is the key to sprouting. The gardens should
be watered once a day (more if they seem to be drying out. perhaps give them
a good drink before you leave for the day. The mister or spray bottle works
well for this as it does not dislodge the seeds by flooding them. Your child
will look forward to doing this each day.

9. Have your child add a little upside down shell to the center of the garden
before the grass starts to sprout. This tiny basin will hold water and becomes
a little pond in your child's garden.

10.Once the grass has sprouted, make the garden a lively place.

11. Use modeling Beeswax to embellish the garden by having your child model
all forms of little things from the beeswax; a little bird, a rabbit, basket
of coloured eggs, flowers.....

12. Push a tiny spreading branch (the tip of a larger branch) into the soil
to become a tree.

13. Glue on tiny balls of pink tissue paper for blossoms and , perhaps, add a beeswax
bird on a beeswax nest. Fill the shell pond with water and add a beeswax duck
sitting on the edge. The possibilities for these gardens seem endless. Use your
imagination to help guide your child and remember to listen to their imaginative
ideas as well!

What is also really nice is to add little treasures you find on your nature walks.
Engage your child in storytelling about how the items came to be where they were found, where they originated, what they are...
This is a beautiful, natural way to teach your child about creation and the task we have been given to steward this wonderful planet that was created for us.

Kathleen